Our Summer intern, Lisa, is a third year sociology major at UVA who is interested in marketing. On her first day, we had her create and edit an interactive 360 degree spin, using our Arqspin turntable and Arqbox lighting tent. We gave her the quick start guide and a turntable, and let her figure out the rest. Here she shares her experiences of creating her first spin.
Getting Started with Arqspins
Yesterday, I got to try out making my first spins with the Arqspin app and turntable. I don’t consider myself a photographer, so I was a little intimidated to create a spin. I have seen some pretty impressive ones, and was pretty sure mine would not compare. I decided try my hand at spinning a stapler, an apple, and a tape measure using my iPhone 6. Nathan gave me the the quick start guide, set me up with a tripod and an Arqspin 9” turntable and left me to own devices.
The app was really straightforward. I popped the stapler down, turned on the turntable, timed my rotation, turned off the turntable and tapped record. And made my first mistake. As soon as I hit record I realized I should have left the turntable on. My reaction was due to not wanting to have my arm in the background, but Nathan explained that the spin actually won’t register properly if the object isn’t rotating initially. I turned on the turntable, and then hit record. Capturing the spin only took a few seconds, and then I was able to edit it. I could crop, adjust color balance and loop points, and add keywords right from the app. I then uploaded my spins to the cloud where I had even more editing options.
Using the Arqbox
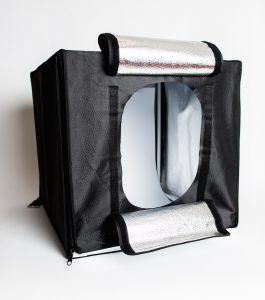
The Arqbox16 Light Tent
After spinning my objects without any lighting adjustments or backdrops, Nathan set up the turntable in the Arqbox16, a really cool portable lightbox designed to work with the Arqspin 9” and 12” turntables. This is when my spins started to look pretty good. The lightbox eliminated the distracting background, and made my objects appear more vivid. Another advantage to the lightbox was that it really simplified the editing process, allowing me to make just a few adjustments with the light balance and paintbrush tools.
Here you can see my tape measure spin, both with and without the Arqbox:
Without Arqbox:
With Arqbox:
My main takeaway from the experience was the importance of centering and lighting. Properly centering the object within my field of view made editing so much easier. The dewobble feature in the editor is amazing, but it works even better when the object is already mostly centered. Centering only takes a few extra seconds but saves lots of time in the editor and yields much better results. Lighting is crucial to good photography. The Arqbox not only enhanced the quality of my spins but it also eliminated background noise, and allowed my object to be the focus. Like centering, using the Arqbox made editing my spins much quicker.
The whole experience was very cool! I was amazed at how quickly I was able to go from an actual object on a turntable to an interactive, easily editable 3d photo on a monitor. I’m really looking forward to making more spins and spending my summer with the Arqball team!